

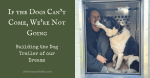
Building the Dog Trailer of Our Dreams
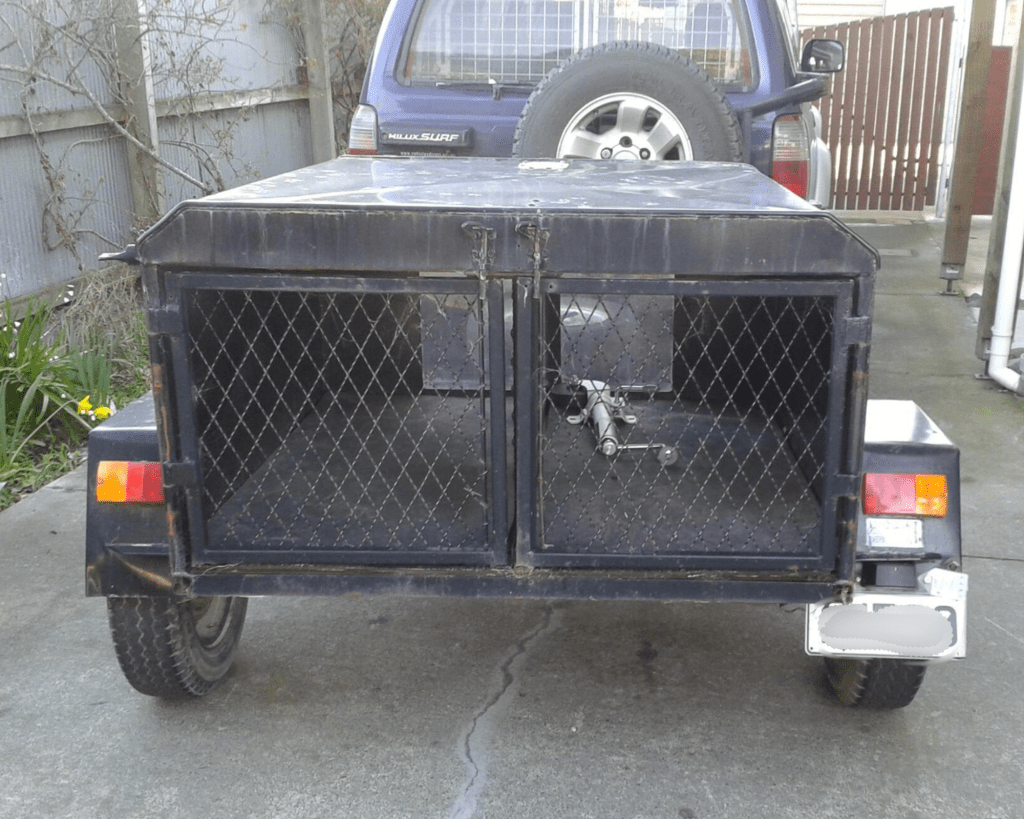
Back in 2016, I bought my first ever dog trailer. Let’s just say she was… agricultural.
Back then, I was competing in agility, and trekking around the country with three dogs, two of whom are still my sidekicks today. While the trailer did the trick, she wasn’t perfect. I arranged for some upgrades, but there were things about her that I couldn’t change.
This set my mental cogs turning. I always hoped that I’d one day be in a position to put all of my ideas together into the dog trailer of my dreams… Enter Josh, and the selling of my business to free up some funds!
While the pack has changed a bit since the good ol’ days, my need to transport dogs everywhere hasn’t. My dogs are my family, they’re my hobby, and they’re a foundational part of all of our outdoor adventures. I’m a firm believer that if the dogs can’t come whatever it is can’t be worth going to.
While a dog trailer is a total luxury, I am also aware of the value that this ‘have’ adds to my life. I’ve been dog-mad since the age of four, and I’ve consistently been a multi-dog household since the age of 22. Much to my mum’s dismay, this is clearly not a phase.
I get lots of questions about the dog trailer, and chances are, if it’s a technical question, I can’t answer it! So, I thought I’d talk you through the whole process, start to finish… I’ve checked with Josh, so rest assured, all the technical bits are correct.
This post has been a long time coming… in fact, in May it will be a full year since we embarked on this rather insane project. Let’s get cracking!
The Design
Dog trailers are funny things. They’re quite personal when you start to get into the nitty gritty of design. Josh and I didn’t want this to be just another dog trailer. For us, this is the vehicle that allows us to travel and holiday with our best mates in tow.
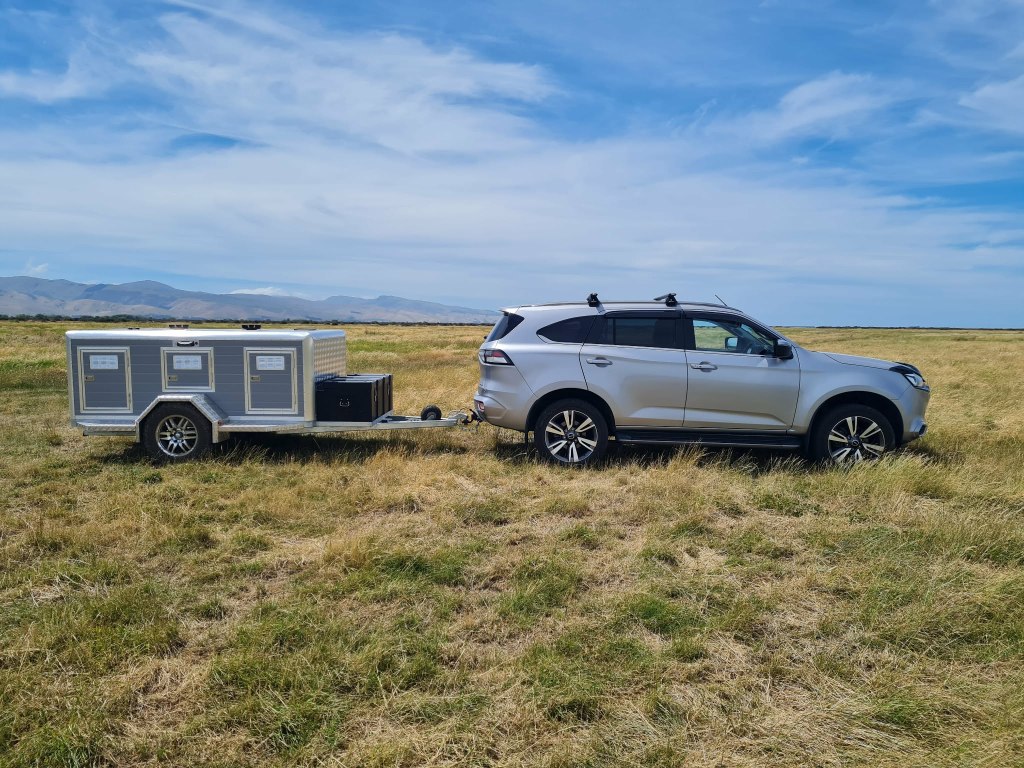
The trailer had to be built with the capability to get us up river beds, dirt roads, and across fields without too much drama. That requires gnarly tires, more ground clearance, and robust suspension to ensure that the dogs have a smooth ride while traversing these types of terrain.
Now, Josh made me promise to include some technical specs here for the lads, so here goes:
- A hot dipped galv chassis and components.
- The box body is made from color steel chiller panel.
- It has stainless steel fixtures with all alloy internal paneling.
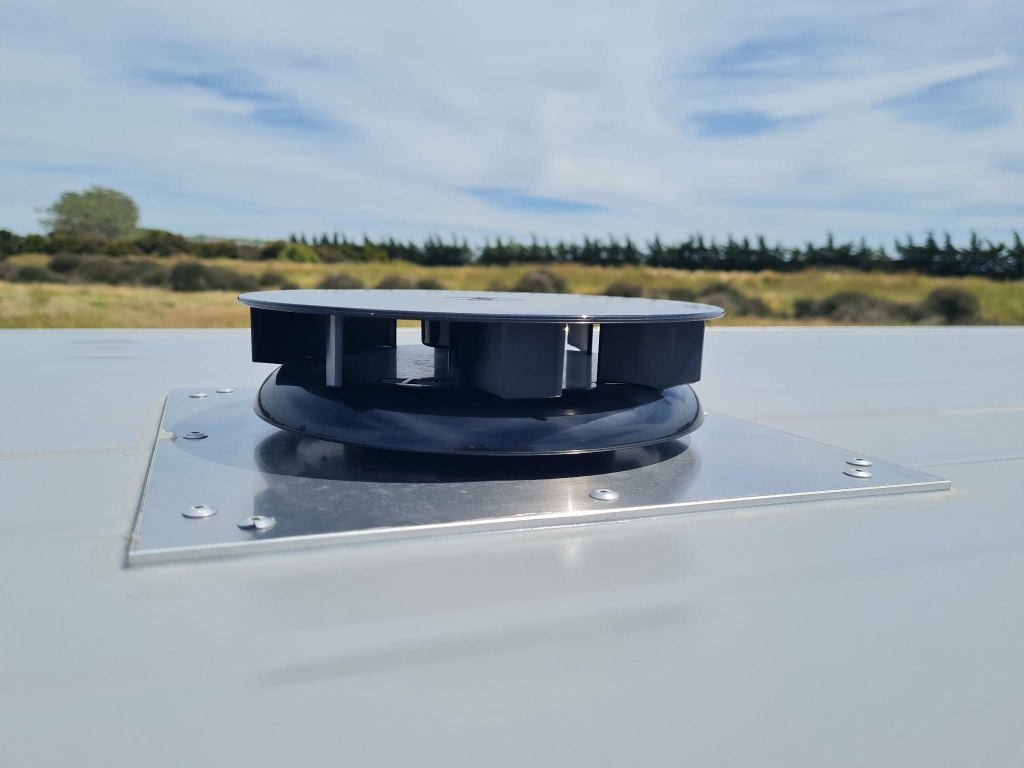
- We went with wind powered rotary ventilators that extract 17 liters or air at 100 kph.
- The wheels are fitted with 30.5″ 10 ply Maxxis Razar AT’s with 16″ Advanti rims (because, why not?!).
- We also added heavy duty leaf springs and paired them with shocks for comfort.
- We used Trans-Tex plywood for the deck.
- We also added caravan stabilisers for when we park up on less then level ground.

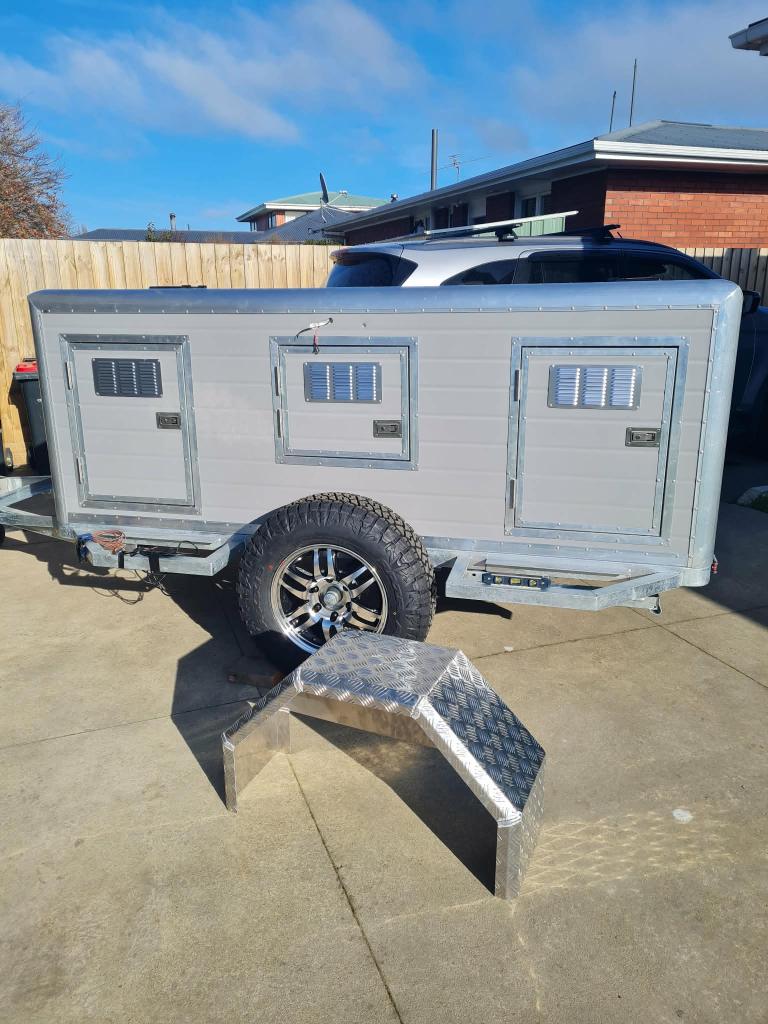
All up, she weighs in at just under 800kg, is 1.7m in height, has 300mm of ground clearance, and is also perfectly sized to fit in our garage.
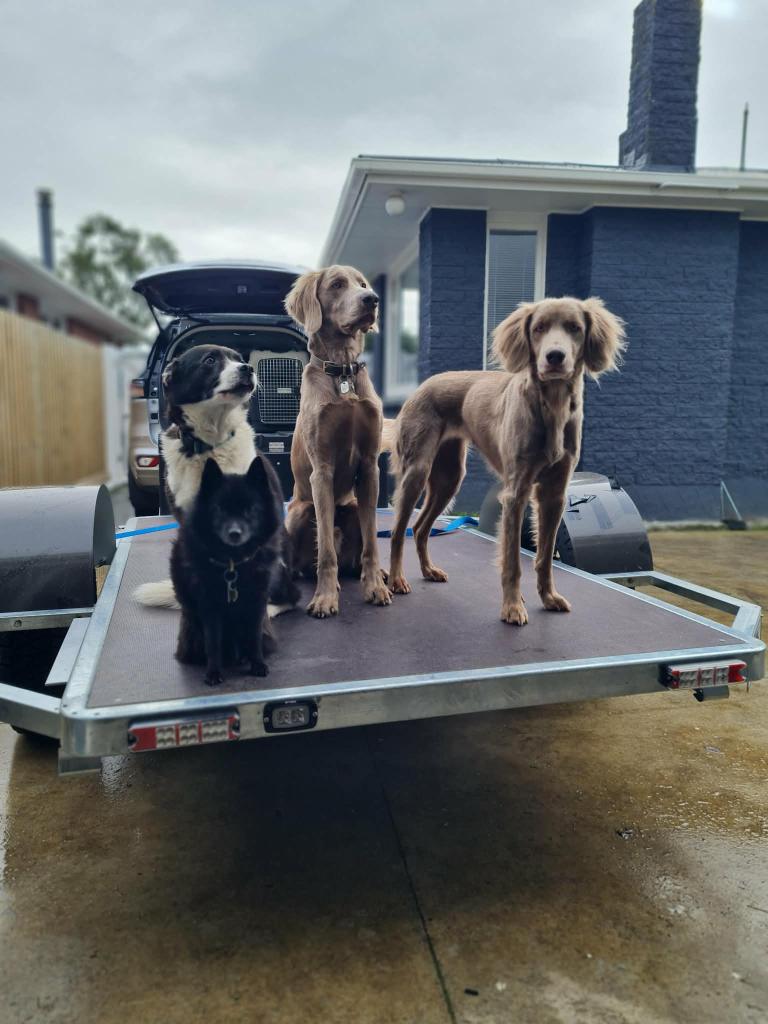
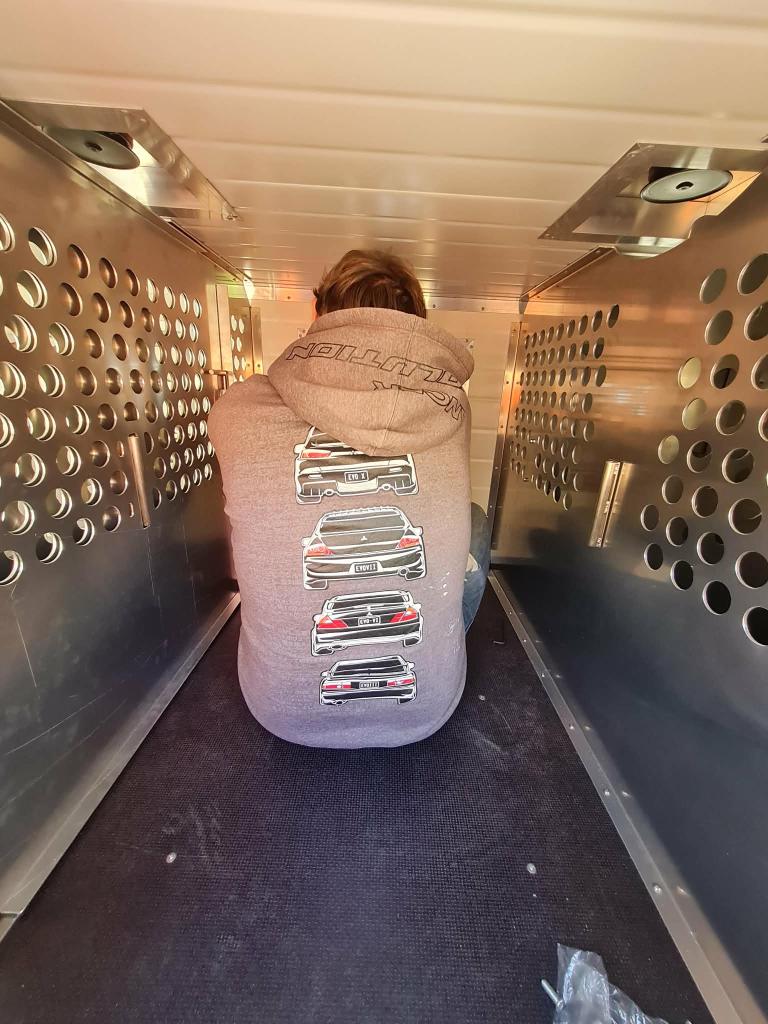
The size and shape of the trailer was really determined by the number of dogs we wanted to be able to accommodate. Initially, we discussed the idea of being able to carpool to events with friends. The thought of having extra space for equipment when going on longer camping trips was a contributing factor, too. This is why there are six dog boxes when we only have four dogs… but there’s nothing wrong with future-proofing either!
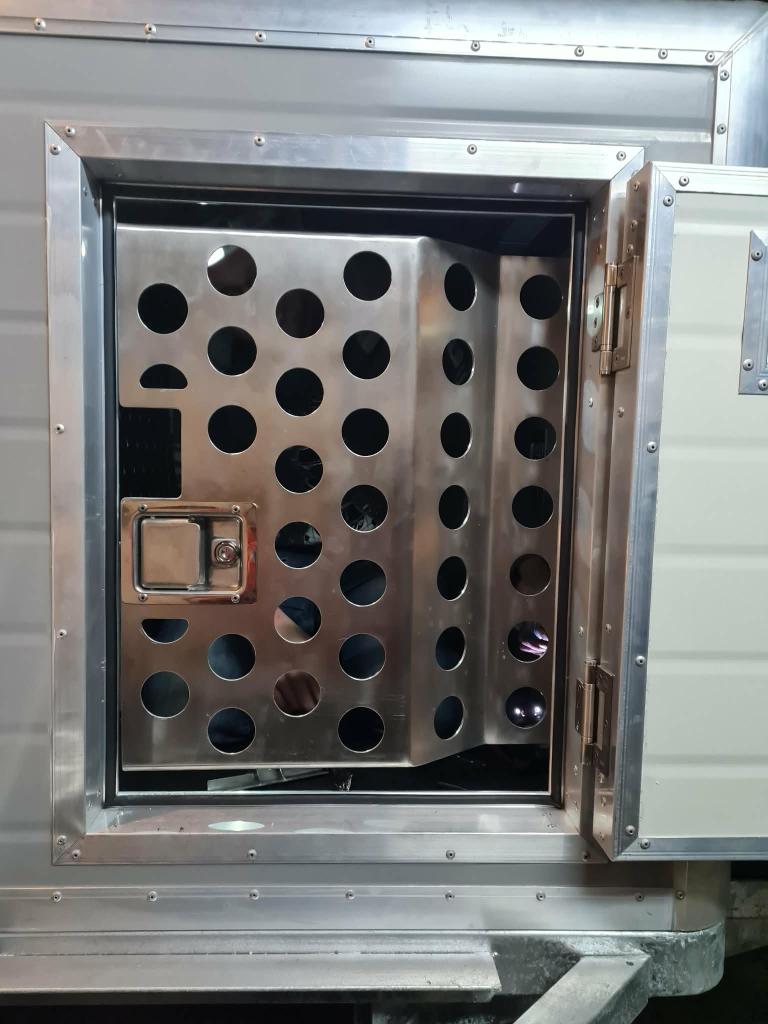
We wanted to give each dog a decent amount of space to be able to lie down and stand up, without giving them so much room that they can’t brace themselves if we’re travelling over rough ground. Each dog box is 750mm x 850mm to allow for this, given that we will likely have medium to large sized dogs in the future. One Schipperke is enough, thanks.
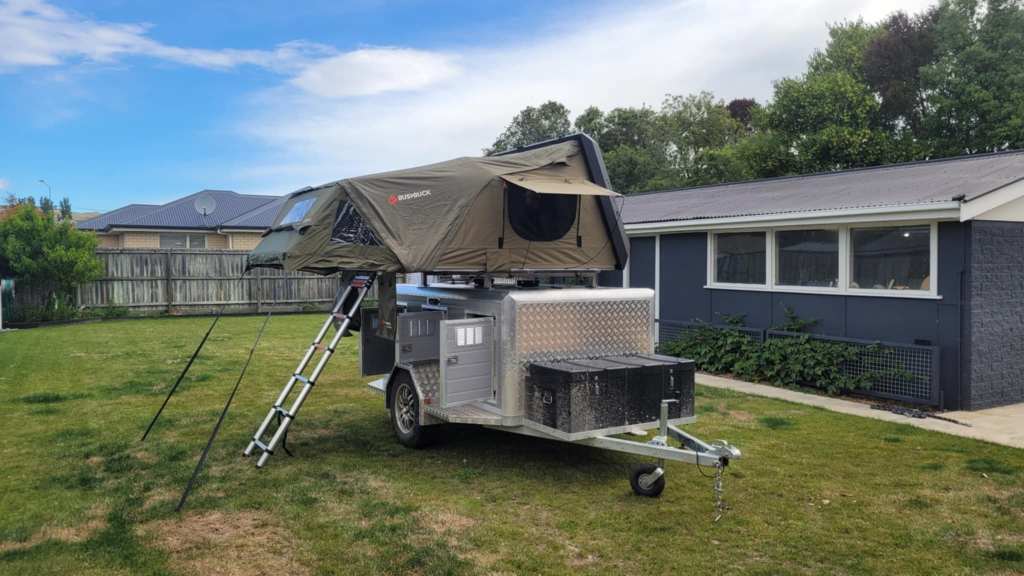
As for our accommodation, we love camping, just not putting up and packing down tents. This is why we made sure that there was going to be somewhere for us to sleep, too. The Bushbuck Armourdillo tent is outstanding! It takes us less than five minutes to put up or pack down. It’s clever construction shows that they really did think of everything when they designed it. It’s mounted on our custom roof racks, allowing plenty of airflow to the air vents for the dogs while travelling or parked up.
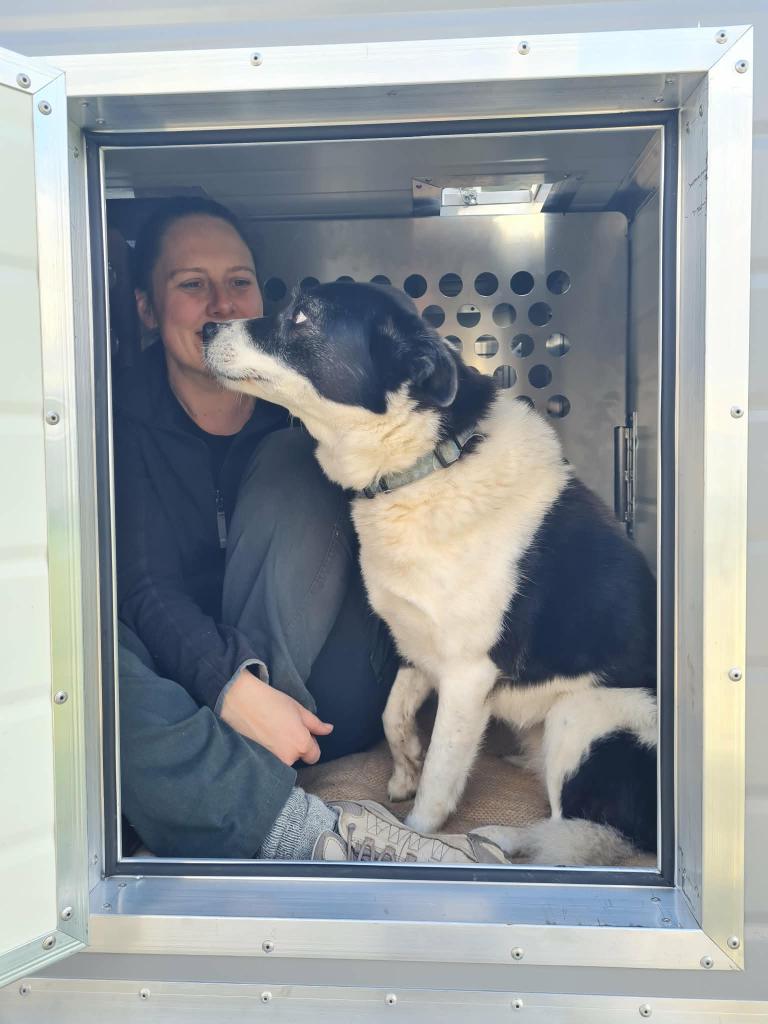
As a control-freak and worry-wort, safety is always my first concern when it comes to the dogs. I’m not made of money and my dogs certainly aren’t paying their own vet bills! That’s why we have the very secure double-door system, designed and perfected by Josh. It has great ventilation for warmer days, secure latches and locks to prevent theft and accidental door opening, and specially designed catches to allow the doors to remain open even on the windiest of days.
Our adventures often involve being out late into the evening or up at the wee hours, so lighting was also an important consideration. There’s nothing worse than trying to feed or toilet dogs in the dark. Especially if you own a tiny black demon that is perfectly camouflaged for nocturnal mischief making! Each dog box has it’s own internal light and there is an external light on each side of the trailer to provide much needed visuals when the dogs are mooching around camp at night. We also put in a reversing light. No more claiming that “I couldn’t see it in the dark”.
Because plans and needs change from trip to trip, we also future-proofed the dog boxes by making the center dividers removable. This means that we can store long things, or bigger things when needed. These neatly attach to the lateral panels so that we can carry them with us.
The Process
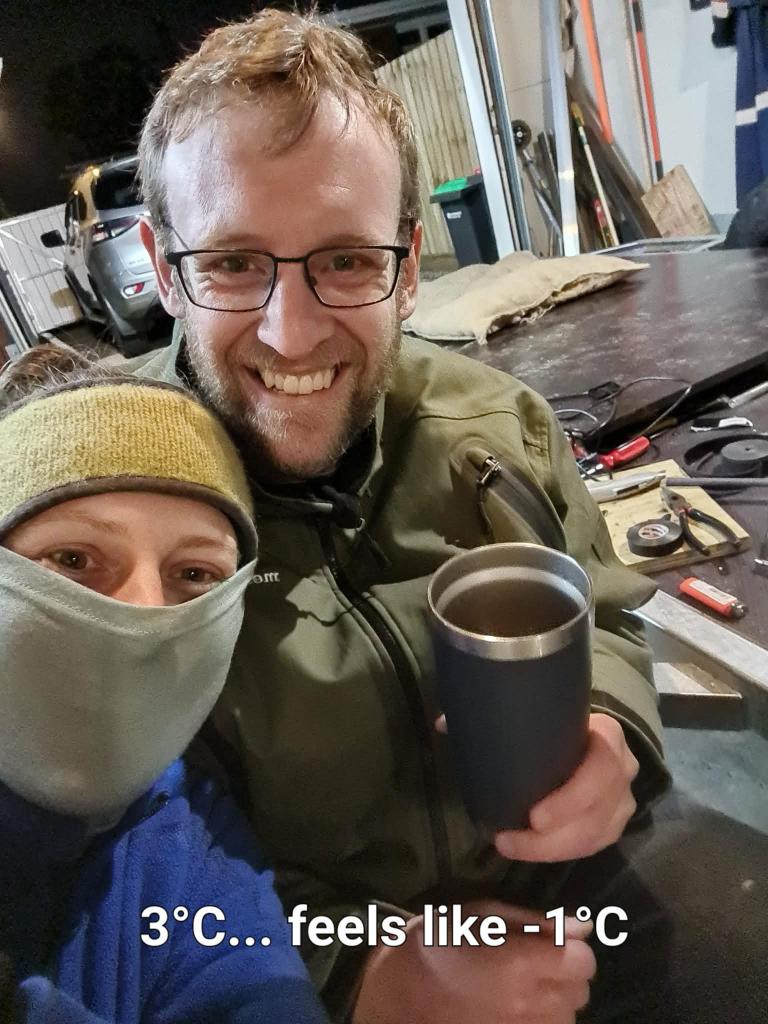
Building the trailer was an experience. We got cracking at the beginning of winter in 2025 because we wanted to have the trailer up and functional by the following summer. In theory, this was a great idea. In practice, it was a terrible one.
Working in sheds and garages through the heart of winter was grueling. One particular evening that stands out in my memory was when it was 3 degrees Celsius and snowing on the Port Hills while we were out in the garage soldering and wiring up the electrics.
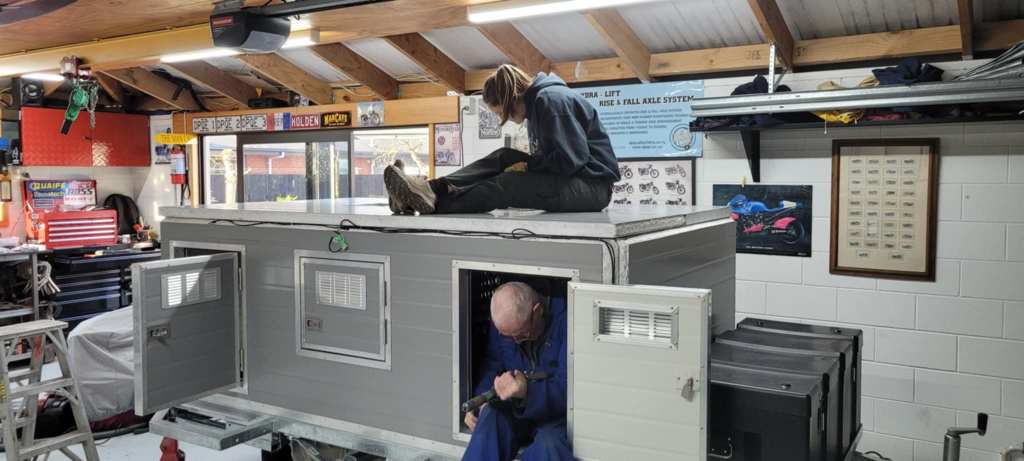
I have to say, watching and helping with the build has given me a whole new appreciation for the cleverness that is engineering. We were very fortunate to have help from Josh’s family, especially his Dad, who are all practically-minded. We couldn’t have done it without them and I will be forever grateful for their support. If they thought we were mad for building this thing, they never said. Bless them!
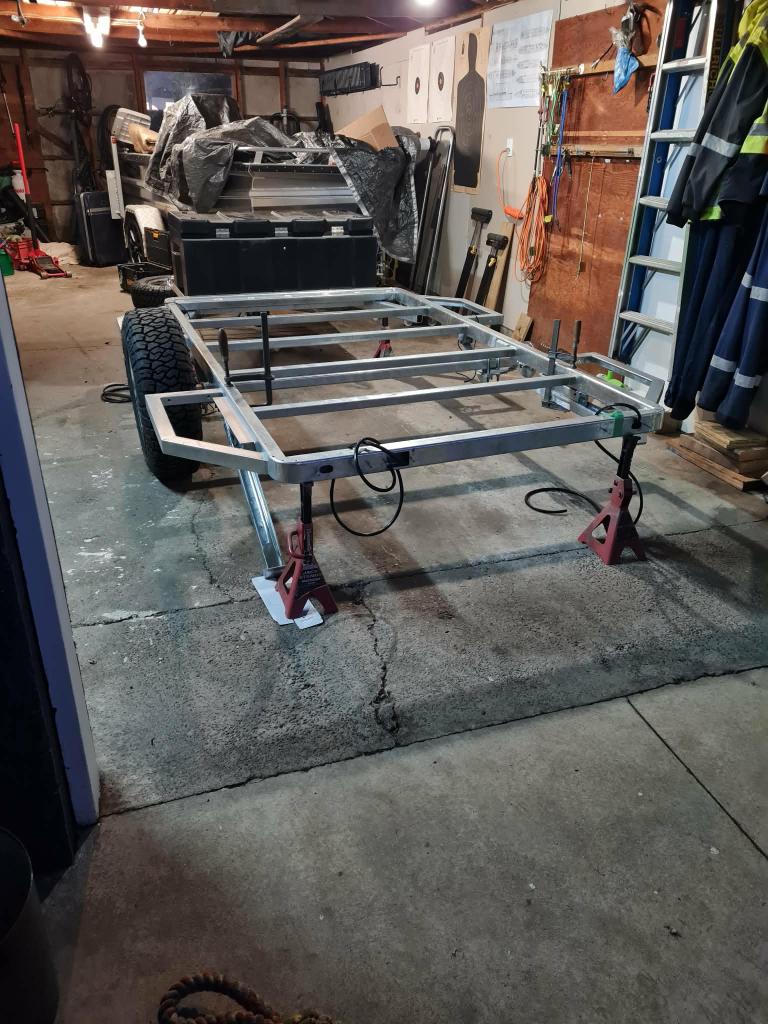
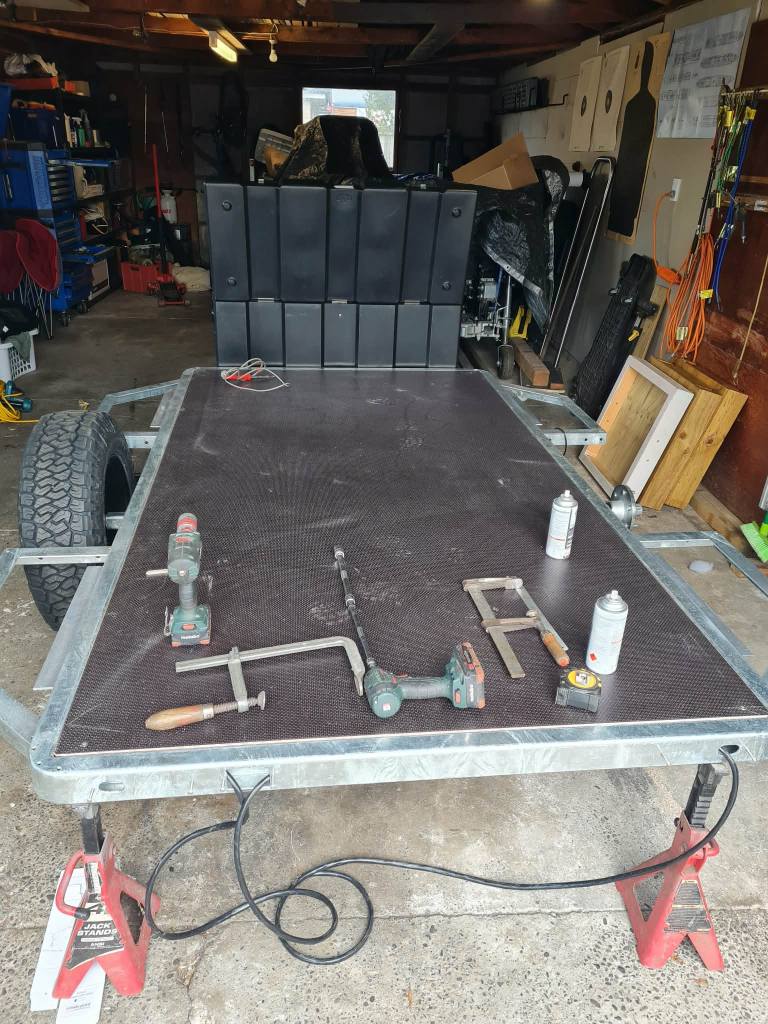
Stage One: The Chassis
Stage one was building the chassis and frame for the trailer. Josh is a man of many talents, so it shouldn’t have been a surprise to me that he could weld. The thing was, we’d only been seeing each other for a few months prior to this… nothing like a major project to test the foundations of a new relationship!
Out of fear of being ousted as completely useless, I let my electrical talents shine with the wiring of the trailers lights. I’m not sure if it was real talent, or just because I have little hands that can do annoying fiddly jobs… regardless, I found myself employable.
With a frame, an axel, working lights, and a tow bar we had a trailer, of sorts. This was an epic first milestone to reach as it meant we could take her in to get her first W.o.F and a birth certificate (aka registration plate).
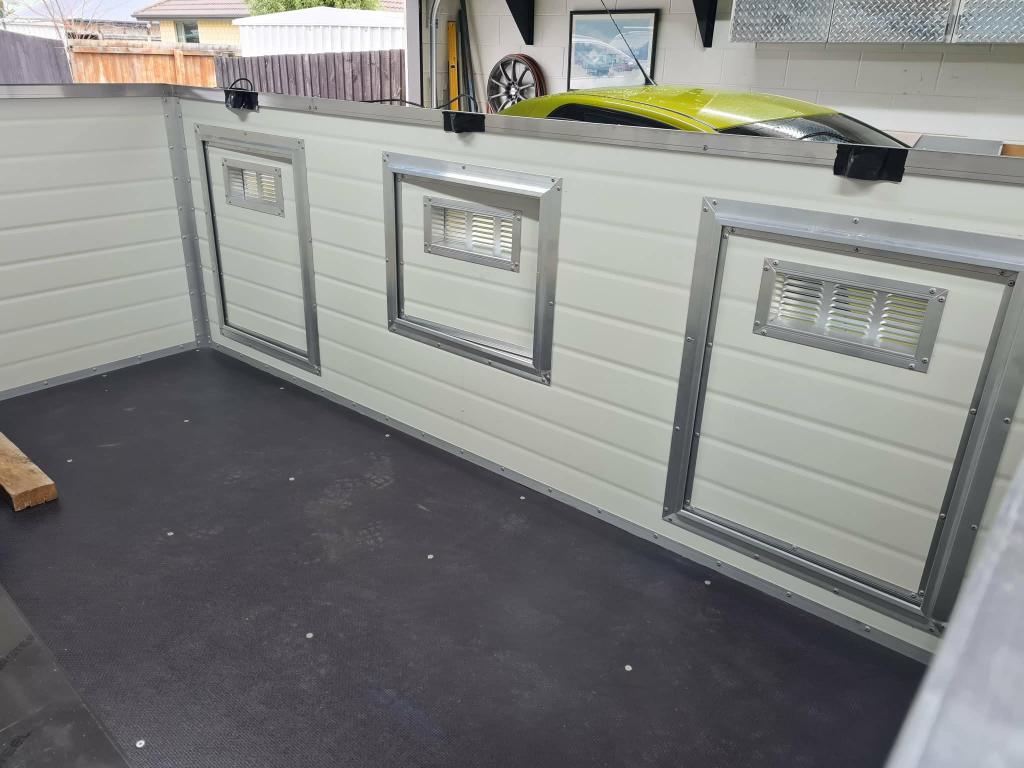
Stage Two: Dog Accommodation
The second stage of development was left in the capable hands of Darryl, Josh’s dad. He spent many hours building the external walls of the dog box from the refrigeration panel, making up the external doors to the dog boxes, and precision cutting the coving to create better aerodynamics for towing.
Josh and I popped out to help with various stages of these projects, and it was incredible to see the transformation taking place. Darryl made it seem like easy work, but I know the hours and hours that went in behind the scenes that made it seem like things were tracking at a great rate of knots.
Once the dog box external walls were on, we had to commission the internal walls. This process was… frustrating to say the least. The company we used to laser cut the steel for the internal walls made a series of errors that ended up in two failed attempts, costing us a fair bit of time, and them a fair bit of money. As they say, third times’ a charm, and we finally got the walls cut correctly and installed… only four weeks behind schedule.
After that, the roof could go on, the internal wiring for the lights could be completed and the coving finished off.
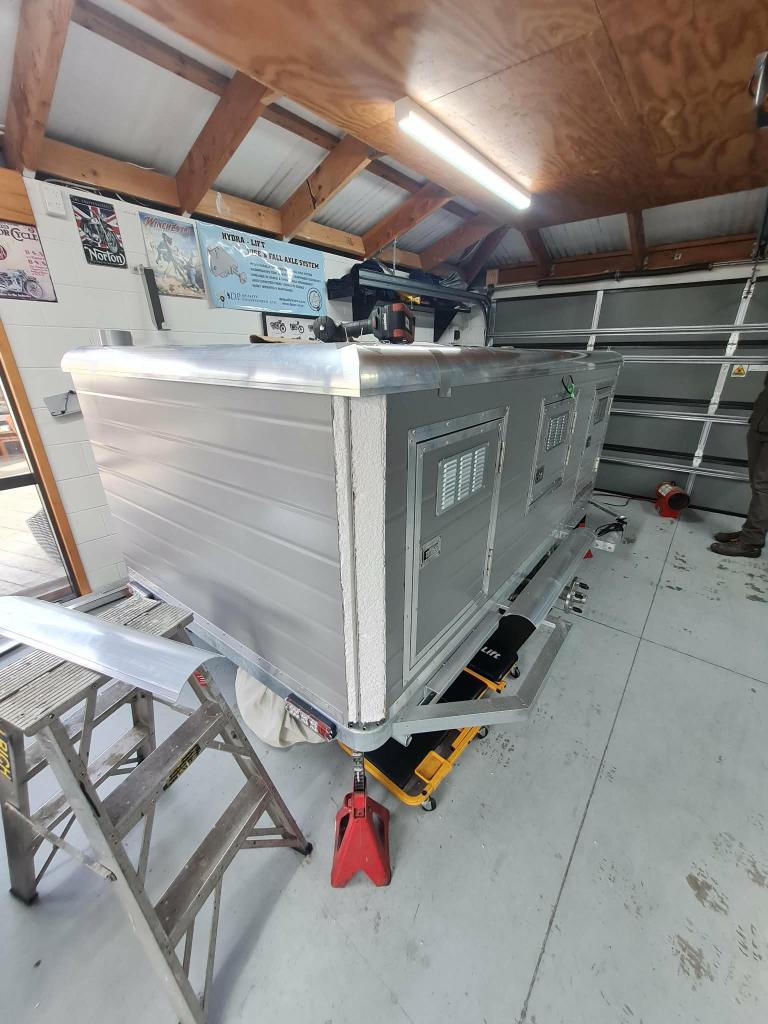
Stage Three: Double Doors

The trailer got to come back home ready for the final works to be done. It was at this point that a tiny bit of miscommunication set in. Josh was under the impression that the trailer was now functional. As it turns out, this was not my understanding.
We had an away dog trial scheduled for about six weeks, with another two local trials squeezed in between. It was at this moment that I chose to point out that I wouldn’t be comfortable taking the dogs away in it until the second set of internal doors were installed. Cue the panic!
To get the second set of internal doors seemed like a pretty straightforward task, from my perspective anyway. As it happens, Josh hadn’t been able to design the doors yet, due to needing to see how the external doors operated in real life. So the pressure was on to design, fabricate and install six custom build steel doors in under six weeks… Crikey!
I’m not sure how he did it, but he did it! If you want to hear about how the trailer’s maiden voyage went, you can have a laugh at our misfortune in my previous post here.
Fully Functional
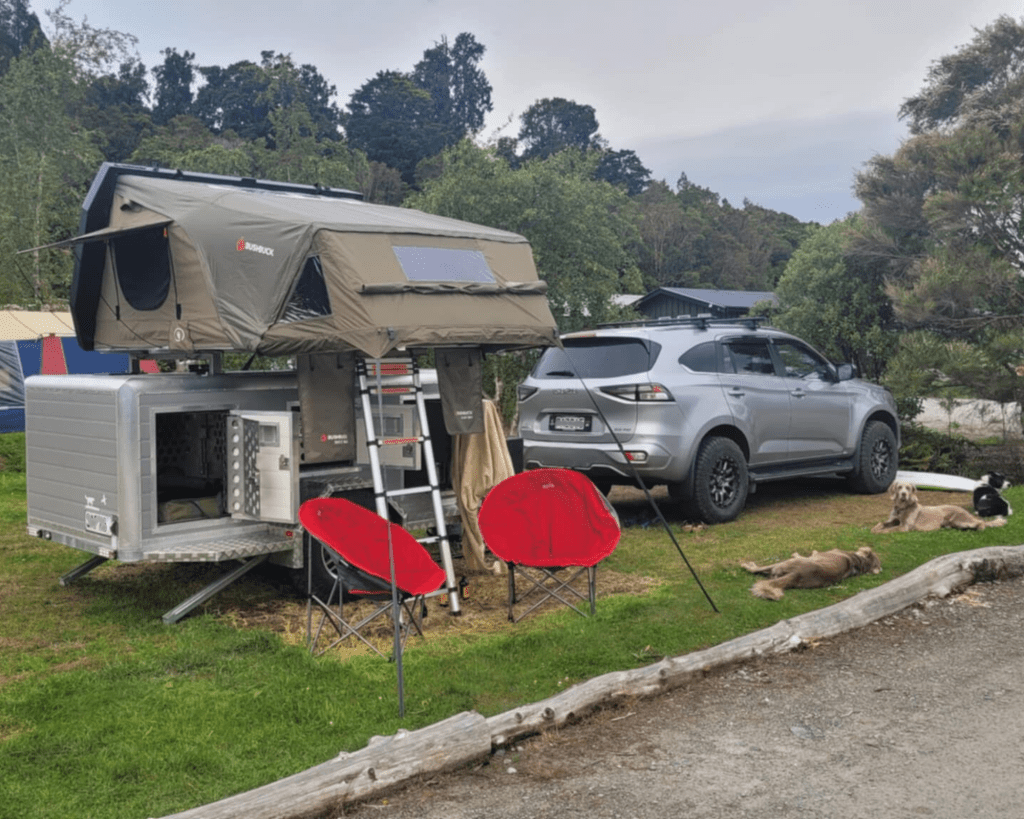
While we still haven’t got all of the internal and external lights working off the battery yet, the trailer is now fully operational. Over the Christmas break we bought the roof-top tent and installed it… no mean feat for two people when it weighs 90 kg! Thank God for a block and tackle!
We have had a few short trips away in it already and it has worked better that we could have ever imagined. It’s little things that just need some tweaking, but they aren’t major enough to warrant getting done in a hurry.
There have been a few things, let’s call them happy accidents, that we didn’t plan for or expect. The height of the roof-top tent is just perfect. I think had it been mounted on the top of the truck it would have felt far too high for me. Not to mention that when the window eaves are open, it keeps the drizzle out of the pop-vents on the dog trailer. Additionally, if it’s pouring down, which it did when we went over to the West Coast, we can leave the external door under the overhang open to allow air flow into the trailer when it’s warm but raining.
We spent the best (or worst) part of the winter months working away on this project under some pretty trying conditions. There were many nights of frozen hands, dripping noses and bruised or scraped knuckles which had us questioning whether we’d picked to do this project at the completely wrong time of year.
On reflection, I think our timing was fairly spot on. We sacrificed sitting in the warmth of the lounge watching rubbish telly so that we could spend our summer out adventuring with our four-legged best mates. If only the weather this summer had gotten the memo!
Despite the unseasonably cold and wet weather, we have plenty of plans for more adventures at the next fine spell. We’re talking about a South Island road trip, hunting in the Molesworth, and many an overnight trip to a quiet fishing spot.
Knowing us, I can almost guarantee that there’ll be more misadventures in the mix, too!


Leave a comment